FPS Animations in Unreal Engine 4 - Review/Tutorial
You can play this test project by downloading the archive here:
https://drive.google.com/file/d/1SL22JkDHgX0ZxgJJozzuMSca0aUVLMJq/view?usp=sharing
https://drive.google.com/file/d/1SL22JkDHgX0ZxgJJozzuMSca0aUVLMJq/view?usp=sharing
WASD - move
Left Shift - sprint
Space - jump
Mouse left click - fire
Mouse right click - Aim down sight
R - reload
F or V - melee attack
Hi! In this small article, I'll try to cover some basic technical aspects regarding rig, animation, and how to import/implement animations into the game engine to build a working prototype, using a standard First Person Shooter project as an example.
For the most part, this article would be useful for beginners and just a bit contains some more advanced tricks. Please keep in mind that the article is not about 3D art/modeling/visual, etc. It's about animation, and more about technical aspects and how to put it into the game engine to test things out.
For the most part, this article would be useful for beginners and just a bit contains some more advanced tricks. Please keep in mind that the article is not about 3D art/modeling/visual, etc. It's about animation, and more about technical aspects and how to put it into the game engine to test things out.
Summary
- Scene setup & rig in Maya
- Animation layers
- Useful links about FPS Animation
- Export FBX files
- Overview of the basic logic of UE4
- Import FBX files into UE4
- First Person Character blueprint
- Animation Blueprint
- Walking (Blendspace)
- Sprinting (State machine)
- Jumping (State machine inside of another state machine; Animation notifies)
- Aim Down Sight (Blend between different state machines; Camera FOV control; Interpolation using timelines)
- Shooting (Montage Play; Gates; Camera shakes; HUD)
- Reloading
- Melee attack
- Aim Offsets (Additive animations; Calculating delta between 2 ticks; Smooth interpolation using tick)
- Files managment
- Download project files
- References
Scene Setup & Rig in Maya
One of the most crucial things in the first-person animation is scene setup - before start you have to know camera angle & position, character height & weapon scale, to place all things in the right place and make work in the game correctly. Also, it's important to set up framerate (usually it's 30 or 60, but not 24)
Basic scene structure contains hands model, hands joints, weapon model, weapon joints (all separate from each other). Hands joints are placed inside of a root joint, which is located at scene's zero coordinates. It's preferable to orient the root joint Z-up, and keep it as a top object in the hierarchy, to make the setup easier. You also can import standart UE mannequin mesh to maya and see how the root joint is oriented there.
Also, we have to add a joint which precisely repeats weapon's movement, it will be used in the game engine as a parent object to our weapon. (in my case it's Hand_Attach_R_ctrl_jnt). It could be placed as a child of a root joint, or right arm directly. You can use constraints to get positions/rotations from the weapon control.


If the project is already in production there might be already prepared scenes with guides and described technical requirements. If it's a personal project, based for example on UE first person character template, - you can go directly to the unreal scene, select FirstPesonCharacter object, press file - export selected, and export it as FBX file. After that, import this FBX file into Maya and you'll get a scene, where things look exactly like in the game.
A few words about the control structure, in the movie industry t's a common practice to use rigs with prearranged constraints, parent spaces switched by a driven key, etc. But in the game industry, you'll never know in advance what is the best option. For example - even though technically weapon should be parented to the right arm it's much more convenient to animate directly the weapon with arms parented to it. Implementation of a parent space switch like this causes technical difficulties, also you might want to use custom pivot points for objects, which is also problematic. Summarizing - it's better to use temporary locators with constraints.
How you can use locators to speed up the animation process:


Animation layers
Creation of multiple animations is much easier with layers, instead of copying and modifying each clip you can adjust it in a few of clicks, for example - WalkForward animation could be turned into WalkRight or WalkLeft with a single key on a separate layer:
And we still save flexibility to adjust the main walk animation if necessary. This might be a trivial example, but in game animation using layers will make your life a lot easier.
Useful links about FPS Animation:
First person animation tutorial
How Great First-Person Animations are Made - 10 Tips for Animating FPS Characters/Weapons in Blender
How Overwatch Conveys Character in First Person
Animation Bootcamp: The First Person Animation of Overwatch
The Art of Destiny's First-Person Animation
Satisfying Reloads | The Art in Reload Animations
Export
Cool! Let's say we did some animations and now it's time for export.


At first, we need to export the hands model and animations. It's a pretty standard thing, use Maya game exporter & selection sets to speed up the process, export mesh + joints for a model, and joints for animation clips. Turn off checkbox "input connections" to ignore rig control structure (curves, locators, etc), and use "embed media" in case you want to pack textures inside FBX file (not necessary, you can always add them separately). Regarding animation clips export - it's important to turn on "bake animation" and ignore input connections/embed media.
With the weapon things become a bit tricky. As it was mentioned before, we placed a special joint which exactly copies the gun motion, so we have to put our weapon in zero coordinates and turn off all translations/rotations before export. Remember, our control-joint will drive the weapon inside the engine. Other export settings are remaining the same.


How this is supposed to work:

Note: Technically, you can achieve the same effect by enabling the "force root lock" checkbox in weapons animations in UE
Overview of the basic logic of UE4
Let's try to understand what is going on using a standard FPS project as an example:


So basically we have to:
1) Modify the FPC blueprint, create logic (are we shooting, walking, sprinting, reloading, aiming, etc.)
2) Create and set up a Hands animation blueprint which would take the information from FPC blueprint and set all animation variables
3) Create a state machine inside animation blueprint with hands animations
4) Set up the transitions depending on animation variables
Import FBX files into UE4
First import models and set materials up. Then import hands animations using the Hands_Skeleton we got from our hands model.
A small tip here - if you messed with the bind pose same as I am - you can go to the model settings, choose "use T0 as a bind pose" and then reimport model.
A small tip here - if you messed with the bind pose same as I am - you can go to the model settings, choose "use T0 as a bind pose" and then reimport model.
After that, create a new аnimation blueprint Hands_anim_BP. (Right click in the file explorer - Animantion - Animation blueprint). Choose Hands_Skeleton as a base. We'll set up blueprint later, for now just drag and drop an idle animation there to see that everything works correctly.
Also, we have to create a new blueprint for our weapon (Right click in the file explorer - Blueprints - Blueprint Class), choose class actor, call it like WeaponBase_BP, put a skeletal mesh component inside and save. Then select WeaponBase_BP, press right click and choose create child blueprint class, name it Weapon01_BP, and for now, that's all, we'll come back to it later while shooting setting.
Also, we have to create a new blueprint for our weapon (Right click in the file explorer - Blueprints - Blueprint Class), choose class actor, call it like WeaponBase_BP, put a skeletal mesh component inside and save. Then select WeaponBase_BP, press right click and choose create child blueprint class, name it Weapon01_BP, and for now, that's all, we'll come back to it later while shooting setting.


First Person Character Blueprint
At first FPC blueprint could be a bit confusing, there are a lot of different nodes, motion control inputs, spawning projectiles, and even the VR logic:

But for a test project we don't need all of that, so let's go to the event graph and delete everything except movement, mouse and jump inputs, also let's delete all default meshes from the BP hierarchy.
After that let's put a hands model to the FPC blueprint hierarchy, making skeletal mesh a child object of a FirstPersonCamera. Set up correct camera's coordinates to match the character height and the center of a capsule component. After that select hands skeletal mesh, go to the details panel - animation - animation mode, and set "use animation blueprint", choose Hands_anim_BP which we created before. Now animation blueprint defines all animations applied to our hands mesh inside FPC BP.
After that let's put a hands model to the FPC blueprint hierarchy, making skeletal mesh a child object of a FirstPersonCamera. Set up correct camera's coordinates to match the character height and the center of a capsule component. After that select hands skeletal mesh, go to the details panel - animation - animation mode, and set "use animation blueprint", choose Hands_anim_BP which we created before. Now animation blueprint defines all animations applied to our hands mesh inside FPC BP.
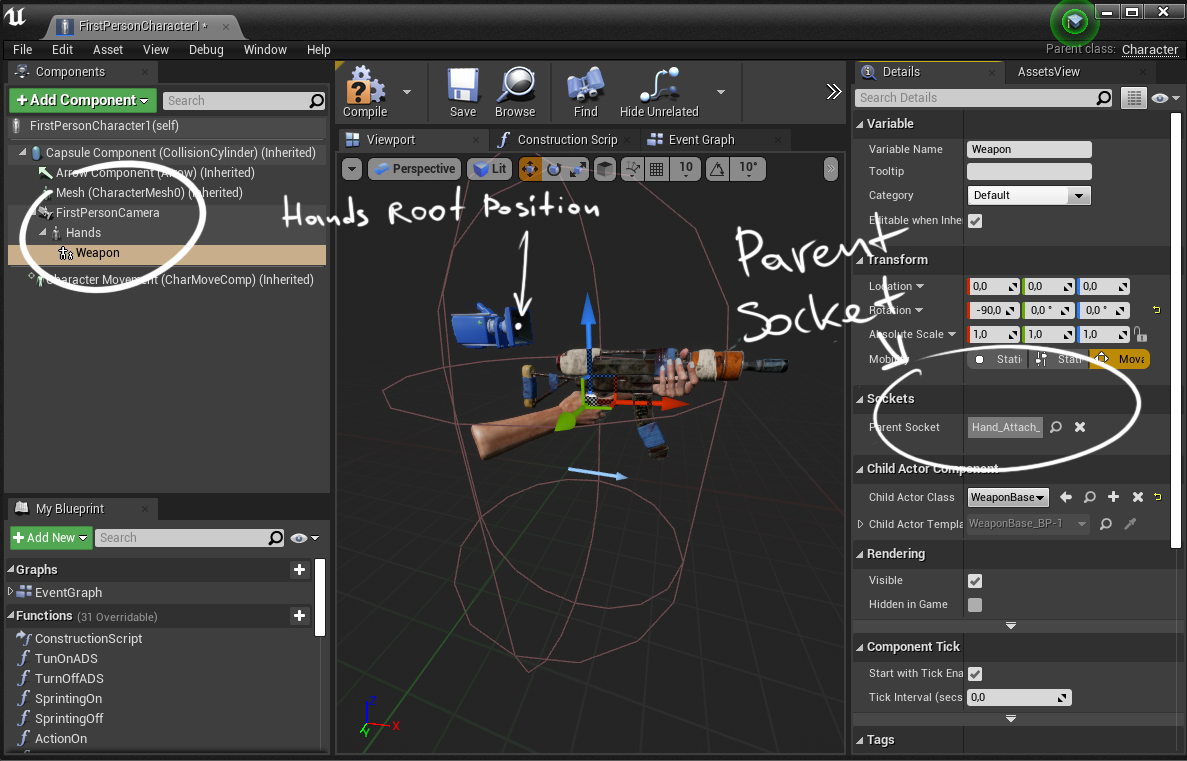
To add a weapon - select hands skeletal mesh, Add Component - Child Actor, then go to the details panel - Child Actor component - Child Actor Class and choose WeaponBase_BP which we created before. Inside sockets choose parent socket - our control joint (Hand_Attach_R_ctrl_jnt in my case). Now weapon repeats movement of Hand_Attach_R_ctrl_jnt joint.
Edited FPC blueprint, weapon parented to the control joint:

After that we have to choose weapon type from our weapon actor component, there could be some advanced logic with multiple classes and conditions, but for now, let's just set directly our Wepon01_BP using SetChildActorClass node:

Great! Now we have an FPC blueprint with correct camera position, our character can walk, jump, but there is nothing but idle pose playing. So let's add more animations, step by step.

Animation Blueprint
Animation blueprint contains all information about animations applied to a particular skeletal mesh. EventGraph contains info about variables, logic, AnimGraph - state machines, blends, transitions, different animation nodes.

There are multiple events inside EventGraph:
- Initialize - called once BP is initialized inside the scene;
- Update animation - called each tick (60 times per second);
- Other/Custom events.
- Initialize - called once BP is initialized inside the scene;
- Update animation - called each tick (60 times per second);
- Other/Custom events.

We have to be careful with Update animation event, because, as you can imagine, calculating complicated things for each game tick could be very expensive
So, at first, we need to "find" an object we're going to apply our animations to. For this use Try Get Pawn Owner, then Cast to FirstPersonCharacter and promote it to variable Casted Character. Set this variable by Initialize Animation event.
So, at first, we need to "find" an object we're going to apply our animations to. For this use Try Get Pawn Owner, then Cast to FirstPersonCharacter and promote it to variable Casted Character. Set this variable by Initialize Animation event.

So in fact now Casted Character "equals" First Person Character, and we can get different values from there, like is the character walking, sprinting, jumping, etc. Let's use it to set up walking animations.
Walking
Unlike the default project where there was only one walk animation, there are multiple walk animations in games usually, it emphasizes the weight and adds more physicality to the movement.
WalkLeft, WalkForward and WalkRight animations:


To implement such thing we need to know not only the fact of moving itself, but also a speed and direction, so let's set a couple of variables at FPC blueprint (input X and input Z):

In animation blueprint - create 3 variables InputXAnim, InputZAnim, AnimSpeed and set them in this way:

Now when we press WSAD our X and Z inputs will go from -1 to 1, and ABS/Clamp nodes will return a value between 0 and 1 which is set as AnimSpeed variable, which will control animation transition.
Now we need to create a 2D animation blendspace for walking. (Right click in the file explorer - animantion - blendspace). Blendspace is basically a node which allows you to blend easily between multiple animations using 1 or 2 parameters, like speed, direction, turn angle, or any other you come up with.
So, we want to blend between WalkLeft, WalkForward, WalkRight and Idle animations, for that let's name the vertical axis as a speed and the horizontal one - direction, and place our walk animations there. Also, you need to tweak Minimum/Maximum Axis values and interpolation time.
Now, when:
speed = 0 - Idle animation is playing;
speed = 1, direction = -1 - WalkLeft;
speed = 1, direction = 0 - WalkForward;
speed = 1, direction = 1 - WalkRight;
speed = 1, direction = -1 - WalkLeft;
speed = 1, direction = 0 - WalkForward;
speed = 1, direction = 1 - WalkRight;

When blendspace is done we need to plug it to animation blueprint. For that go to the anim graph, create a new state machine, (we'll need it later), then go inside it and create a state "IdleWalk", and put our blendspace there, connecting AnimSpeed and InputXAnim variables as inputs:


And how it works:

Sprint
Besides sprint itself, we need to add some additional animation transitions like "going from walk to sprint" and "going from sprint to walk", it adds more physicality and improves general impression. The default blending also works, but it looks rough and not so natural.
From left to right - WalkToSprint, Sprint, SprintToWalk animations:


Before implementation we need to add some additional inputs, so let's go to the project settings, choose inputs and add one for the sprint, for example - the left shift button. We can also add some inputs in advance, R for reload, F/V for mele attack, right mouse click for the aim down sight.

So now we can decide what happens after the sprint input. For this let's go the FPC blueprint and create two functions SprintingOn/SprintingOff and connect them to the corresponding inputs. The functions are changing max walk speed parameter and setting isSprinting? bool. (Basic walk speed is equal to 600, sprint speed multiplier is 2 in my case)
You can also play with the camera field of view while sprinting, but it provides additional problems with the composition, some guys are using two cameras, one for the character with weapon and second for the environment, but for this small project, this would be a bit overwhelming :D


Regarding the animation blueprint, we need to set one variable SprintingAnim, and modify our state machine by adding 3 additional states and 4 transitions:


1) to go from IdleWalk to Sprint (through the WalkToSprint state) we should be moving (AnimSpeed >0,01) and the SprintAnim boolean should be true
3) the opposite, if we're not sprinting or not moving we'll go from Sprint to IdleWalk (through the SprintToWalkIdle state)
transitions 2 and 4 based on the TimeRemainingRatio node, which simply tells us when our state comes to a certain point (like 70% or other required value)
3) the opposite, if we're not sprinting or not moving we'll go from Sprint to IdleWalk (through the SprintToWalkIdle state)
transitions 2 and 4 based on the TimeRemainingRatio node, which simply tells us when our state comes to a certain point (like 70% or other required value)
transition rules:


Result:

Jumping
The general approach regarding jumps involves using 3 animations: jump start, which emphasizes the vector of upward motion, jump loop, some kind of floating "in-air" cycle, and jump end - landing which shows us the reaction to the floor. In our case, as we have 2 types of significantly different motion (walking and sprinting), we need 2 packs of animations. So I've prepared 6 clips for that:
JumpStartWalk, JumpLoopWalk, JumpEndWalk, JumpStartSprint, JumpLoopSprint, JumpEndSprint


To control transition we need to create and set isInAir? bool in the animation blueprint:

Here is a little trick. You can record a cached pose from a state machine, and then use it inside another state machine. For example, here I'm using locomotion cached pose from state machine Main as grouned state inside Jumps state machine.


Transition rules are quite simple here:
1) if the bool isInAir? is true we'll go to the JumpStart
2) after JumpStart animation ends we'll go to the FallLoop
3) the transition to the JumpEnd will be executed in case if ours isInAir? bool is not true
4) when landing animation ends we'll go to the grounded state (locomotion)
But there are a few moments here, the player is able to simply spam jump button, so we have to add two more transitions, from state to JumpStart with same isInAir?=true condition, and the opposite
Also, the player is able to press or release the shift button while jumping, so we have to use another little trick:
You can add a notify inside animation to call an event at animation blueprint. The event will execute logic you need.
Let's use this technique to "remember" have player jumped in walk or in sprint. For that create notifies JumpInSprint and JumpInWalk inside corresponding JumpStart animations. Now wnen JumpStartSprint or JumpStartWalk animation is played - one of the events AnimNotify_JumpInSprint or AnimNotify_JumpInWalk will be called. So, create a bool SprintInTheAir inside anim BP and set it using the events above. Animations inside JumpLoop and JumpEnd states will be chosen by this bool.
So, after that, even player would spam shift button while jumping - SprintInTheAir bool won't change and animation for JumpLoop and JumpEnd will still work correct.
Transition rules and states:


How it works in the game:

Aim Down Sight
In my case aim down sight animations are very simple, model is placed in a correct place, exactly in a line with the camera center.
ADS Idle and Walking animations:


When we're going into the aim down sight mode, a camera field of view and the character's speed should be changed.
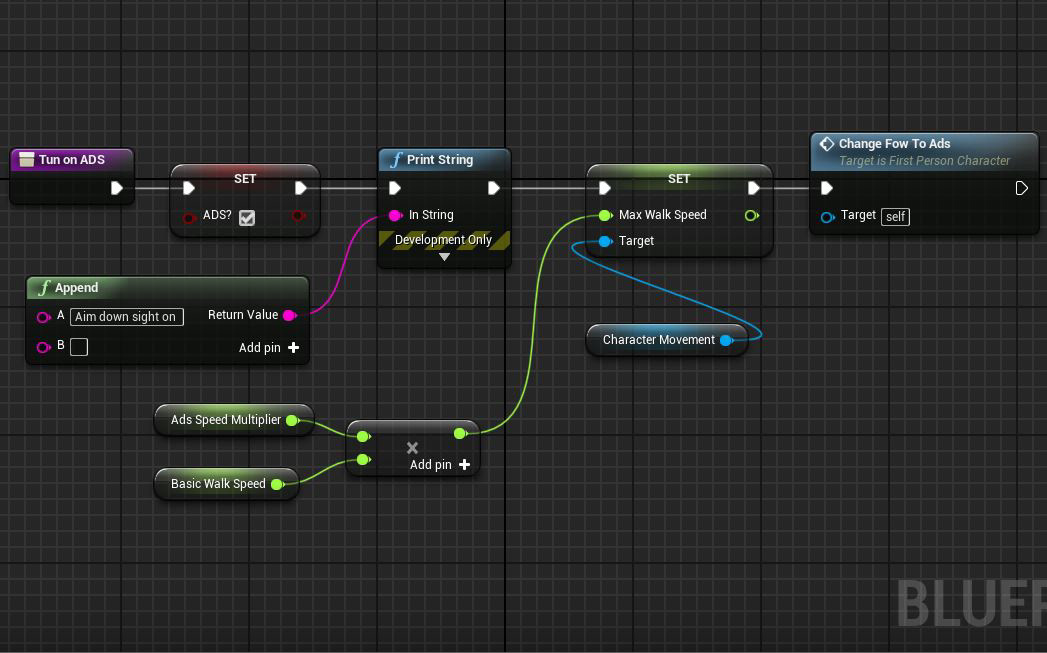
For that let's lets go to FPC BP and create two functions and connect them to our ADS input, in a way that when we're in a regular state and doing right click we'll call a TurnOnAds function which sets ADS? bool to true, decreases the character's speed, and calls an event which would change camera FOV, and if we're already in the ADS mode right click will call the opposite function which brings everything back to normal:


For camera FOV tweaking we're simply calling a custom event, where the camera angle is changing with this timeline setup:


(ADS FOV = 45 degrees, No ADS FOV= 75 degrees, time = 0.15 seconds)
Next step would be modifying sprint logic and checking IsInAir condition, these actions should turn the ADS mode off:


Cool! FPC part is done, now we can modify our animation blueprint, set an Ads?Anim bool and create a separate state machine specially for the ADS mode. There are only two states - idle and moving, and the transition is based on the AnimSpeed float (if it's greater than 0,01 we go to move state, and back to idle in case it's lower)


The switching between state machines is done by Blend Poses by bool node, which uses Ads?Anim as an input:
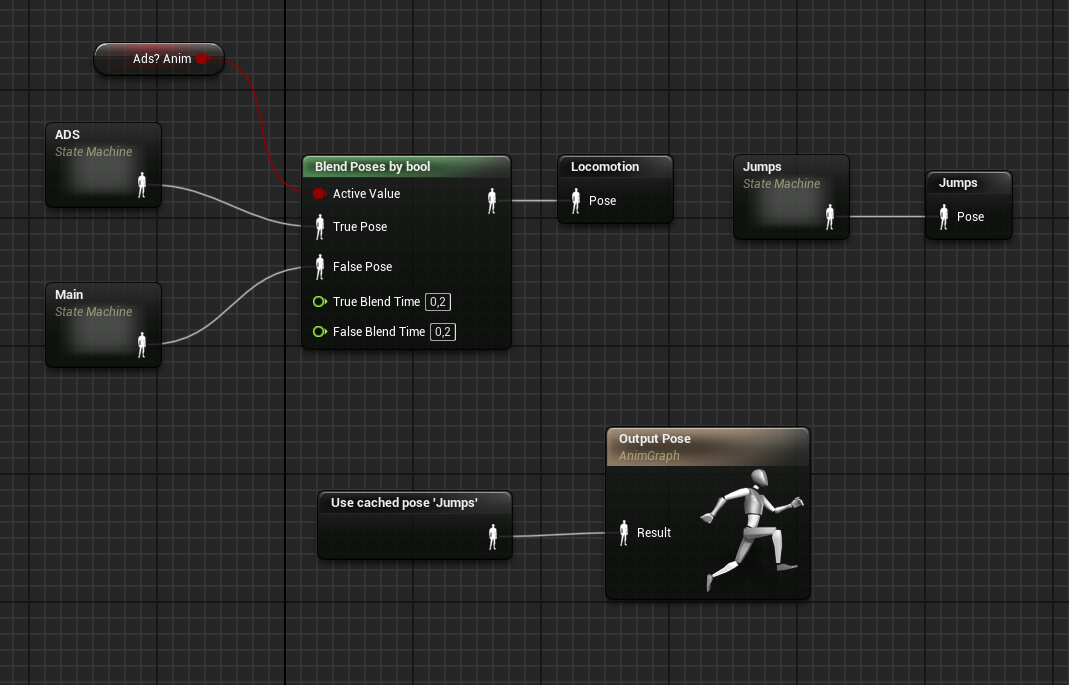
Done!

Shooting
Finally, we can set up our shooting animations! In general shooting strongly depend on the game design, a weapon could be single shot or be automatic, different characters could use different animations, etc. So I've prepared several animations considering our character is some kind of an amateur and when we hold left-click we're going into a cycle where the weapon starts shaking like crazy
Single shot, ShootStart+ShootCycle+ShootEnd for regular statemachine, and the same thing for ADS mode:


Now it's time for implementation, but there is a problem, in case we do it as usual with a variable and regular transitions our state machine will become an absolute mess with no chance to figure it out:
Example of a badly organized state machine:

Those kinds of actions which could be launched from "any state" require another way.
We can put our state machine into a slot and use a MontagePlay node to overwrite everything which is inside this slot. In this case, we don't care what is happening inside a state machine, if we press left click we'll shoot anyway:


( to create an animation montage - right click on the required animation - create - create AnimMontage)
In case our weapon is some kind of rifle or shotgun or revolver - every shot should be a single montage. In other cases, we can use more complicated structures, for example - a start animation, then a shooting cycle and the end animation with some overshoot reaction, this thing could be different depending on what kind of effect we want to achieve. Also it' important to set a correct slot inside a montage.

Before tuning the FPC blueprint there are a few moments regarding weapon's behavior to be done, obviously, we have to create some logic for the ammo count, set weapon animations, spawn some visual effects if you want, etc, so let's go to the Weapon Base blueprint and make some changes.
First, we need to create several several events - Fire, StopFiring, NoAmmo, Reload, and a bunch of variables - ReloadTime, ShootsPerSecond, AmmoCount, MaxAmmo. I'm also using a shot counter, an int which increments with each shot, and the bullet spread, which increases after shoot counter reaches a certain value and goes down in the ADS mode
Then we have to go to the actual Weapon01_BP and set these variables through the construction script:

How shooting works:
- When we get an event Fire - we're opening the gates, then entering them and executing shot logic once (ammo check, line trace, spawning shell, camera shake, etc.)
- After that, we're checking: is the AmmoCount still more than zero? If yes - we can enter the gates one more time and execute shot part again (after the delay which equals 1 second/shots per second).
- If the ammo is zero - we close the gates, call an OutOfAmmo event to stop fire animation montage and play a special sound.
- Also, we can close the gates by the event StopFiring.

Ammo Check function just decrements Ammo Count, increments the Shot Counter, plays weapon shoot animation, and plays appropriate sound:

Now, going back to the FPC blueprint, despite the size the logic is very simple:
- first, after the fire input, we have to check the action bool (we'll set it later) to prevent shooting while reloading/melee attack
- then if ammo count is more than 0 - we are able to shoot, for that we call a Fire event with WeaponBase_BP as a target
- then we have to check if our character is sprinting, and if yes - turn sprinting off
- and finally play the anim montage, depending on are we in regular or ADS mode
- After we've released fire button we have to call StopFiring event and play ShootEnd anim montage

Camera shake event launches a Play World Camera Shake node with prepared cam shakes, Oscillation duration should be comparable with the shot duration (we execute the shake for each shot), and the amplitude for camera roll and positions should be tiny. I would not recommend you to use yaw or pitch shakes, it could be confusing for the player.


We can also create a HUD and add a simple UI element which would show current ammo and max ammo values:


Done!

Reloading
Usually, the reload animation is short and simple because the player sees it a lot and it would irritate him in case animation is too long. This animation is 3.5 seconds which is actually huge, but also it is a requirement of the particular design.
Reloading animation:

Regarding implementation everything is easy, as reloading could be launched from almost any state (same as shooting) we also use montage play setup:
- after R input we have to check is current ammo count less than max ammo? if yes - we can reload
- check are we in action already? to prevents bugs
- call ActionOn function, play the reload animation montage and call the Reload event at our WeaponBase_BP blueprint
- after a certain delay (reload time) call ActionOff function

An additional isInAction? check is necessary to prevent bugs like shooting while reloading, shooting while melee, reloading while melee, etc.
ActionOn function turns off ADS/sprinting mode and calls StopFiring event at WeaponBase_BP:


Coming back to the Weapon01_BP, Reload event plays a reload animation and after a certain delay sets ammo count to the max ammo value:

Done!

Note: in real FPS games reload animation setup usually is a bit more complicated, it can contain IK setup to customize character/weapon size, attaching the magazine to the left hand while reloading, and spawning it to be visible on the ground after reloading. Also, usually camera is animated.
Melee Attack
Animation of the melee attack also depends on game design requirements, it could be realistic with some sort of delay between input and action, or it could be instant, for example - in PVP shooters like Overwatch attack takes only 1-2 frames, and the rest of animation is overlaps and reaction.
Melee attack animation:

With the implementation of the melee attack everything is similar to the reloading:
- checking isInAction?
- calling an ActionOn function
- playing mele animation montage
- after a melee time delay calling ActionOff function

Also, we can place a collider inside a weapon blueprint and set our character as an exception, so now we can punch objects with melee attack :D


Aim Offsets
To achieve more physicality we can tweak a bit weapon motion using aim offsets overlays depend on mouse movement. For example, if you look closer to game animation you can find that weapon have some sort of delay relative to the mouse movement:

In more advanced setups like in overwatch game, there are not only delays but some overshoot animations. But it requires more complicated logic, so for this moment let's implement a simple version with delays only.
To implement such a system we have to build Aim Offset blendspace based on additive animation poses, where axes areYaw and Pitch values.
In additive animation you have to put some "neutral" animation as a base pose. For example, I'm using shifted Idle animation as an offset pose, so I have to use a regular idle as a base pose:


Use "Mesh Space" anim type. You can tweak minimum/maximum axis values and interpolation time to achieve acceptable results.
Here is a little trick on how to calculate the Yaw and Pitch delta values. We can get camera world rotation, promote it to a variable, and then compare it to itself like on the picture below, to get a difference between 2 ticks:

1) Get delta between 2 ticks
2) By dividing it by a Tick time we got the "rotation changing speed" which should control our AO blendspace.
3) The value we got here is too intence, so we can divide it by some constant (AOIntensity = 9 in my case)
4) smoothly interpolate it using FInterpTo node.
2) By dividing it by a Tick time we got the "rotation changing speed" which should control our AO blendspace.
3) The value we got here is too intence, so we can divide it by some constant (AOIntensity = 9 in my case)
4) smoothly interpolate it using FInterpTo node.
Tick time (Delta T) is setted by Update Animation event:

Applying AO node after slot affects not only idle animations but fire animations as well.
Note: As was said before, interpolating values through a tick is not always the best option, in general it's better avoid it unless it's necessary.
Note: As was said before, interpolating values through a tick is not always the best option, in general it's better avoid it unless it's necessary.
And the final version of the state machine looks like this:

AO Alpha and AO ADS Alpha variables are setted in anim BP using ADS bool:

And how it works in the game:

Files managment
As animation count in game projects can expand really fast - I'd recommend you to write down the animation list, with all clips and required export parameters. You can also track the progress status by coloring the rows in appropriate colors (yellow for work in progress, green for done, etc.)
This small project contains 37 animations:

This might be all for now, we've integrated a bunch of animations into our shooter proof of concept project! You can download the assets and UE project by the links below. Please use it for educational purposes only. Thank you very much for your patience and hope to see you on my page again :)
References
Thank you for watching!

